MODULES DE FORMATIONINSTRUCTIONS
DOCUMENT DE TRAVAIL
EXEMPLE D'EXERCICE
THE STRUCTURE OF THE DISTANCE TRAINING COURSE
Each module of the training course must be structured following these guidelines :
- Each module will be created in Power Point
- Each module will be composed of about 100 slides
- Each module has to be divided in to around 10 Didactical Units of about 10 slides each (i.e. 100 slides in total)
- At the beginning of the Module there will be an index that allows the learner to choose amongst the Didactical Units
- At the beginning of the Module there will be an entrance test
- At the end of each Didactical unit there will be a practice exercise (self-assessed)
- At the end of the Module there will be a final evaluation test (which will be sent to the course tutor)
- Each module will be produced both in English and in the partner language
- See annex 1 - an example of the course structure.
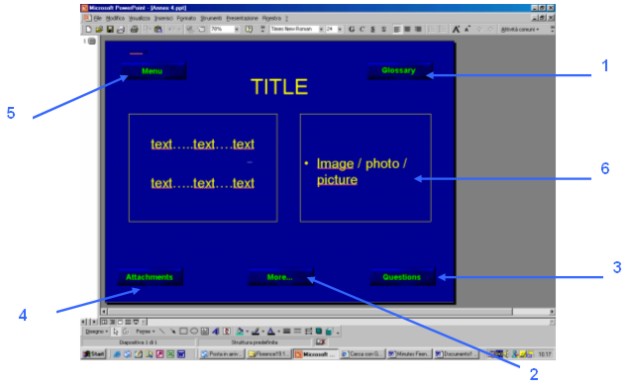
The diagram below illustrates the basic structure for each slide of the training course (see Annex 1)
For each slide the following links are possible (but not compulsory) :
1. Glossary which will link the slide to the Hypertext glossary.
2. More…which will offer more detailed information of the content of the slide.
3. Questions, the Outlook Express browser with the tutor's e-mail address already inserted will open, allowing the learner to send an email to the tutor.
4. Annexes to link up all types of document (e.g. pdf, word, etc.) or a movie related to the slide.
5. Menu to navigate within the didactical units or to return to the index.
6. The slides can contain images (optional).Each group of schools responsible for the creation of a training module should also carry out the creation and correct functioning of the above-mentioned links and their related buttons (Menu, Attachments, Further consultation, Glossary) within the module.
N.B. : In the case that a slide does not have any attachments or more information, the relative buttons must not be inserted.
How to create the links
Menu :
- Click with the right button of the mouse on the Menu "button" (copy the buttons from the example on Annex 1).
- Click on "hypertext link" (it should be the last choice in the menu list).
- Click on "Insert in the document" (on the left) and choose the slide to which you want to link to. In this case it is slide no.1 where the Index is displayed.
- Click on "ok".
- Obviously the titles of the different sections listed on the Index page must be linked to the appropriate page.
- Select the whole of the title using the mouse (in the example "Introduction…p.2).
- Click with the right button of the mouse .
- Click on "hypertext link" (it should be the last choice in the menu list).
- Click on "Insert in the document" (on the left) and choose the slide to which you want to link to. In this case it is slide no.2 where the introduction starts.
Attachments :
- In order for the attachment links to function, all the attachments (Word,PDF etc files) must be saved in the same folder as the Power point file of the training course.
- Click with the right button of the mouse on the Attachments "button" (copy the buttons from the example on Annex 1).
- Click on "hypertext link" (it should be the last choice in the menu list).
- Click on "Existing file or web page" (on the left).
- Click on file (on the right beneath find) and find and click on the file where you want to create the link to. The name of the file will be inserted in the box.
- Click on "ok".
Glossary :
- In order for the attachment links to function, the Glossary file must be saved in the same folder as the Power point file of the training course.
- Click with the right button of the mouse on the Glossary "button" (copy the buttons from the example on Annex 1).
- Click on "hypertext link" (it should be the last choice in the menu list).
- Click on "Existing file or web page" (on the left).
- Click on file (on the right beneath find) and find and click on the file where you want to create the link to (the file with the glossary). The name of the file will be inserted in the box.
- Click on "ok".
More :
- Click with the right button of the mouse on the More "button" (copy the buttons from the example on Annex 1).
- Click on "hypertext link" (it should be the last choice in the menu list).
- Click on "Insert in the document" (on the left) and choose the slide to which you want to link to. In this case it is slide no.3 where more information on the Introduction is displayed.
- The "Back" button must be inserted which is linked back to slide 2.
- Click with the right button of the mouse on the Back "button" (copy the buttons from the examples on Annex 1).
- Click on "hypertext link" (it should be the last choice in the menu list).
- Click on "Insert in the document" (on the left) and choose the slide to which you want to link to. In this case it is slide no.2 of the introduction.
Questions :
- Click with the right button of the mouse on the Questions "button" (copy the buttons from the example on Annex 1).
- Click on "hypertext link" (it should be the last choice in the menu list).
- Click on "E-mail address" (on the bottom left) type in the e-mail address of the tutor for this module.
- Click on "ok".
Once you have inserted all the links (including the "Back" button where necessary) you must save the power point presentation in pps. Format.
- Click on "File".
- "Save as".
- " Under "type of file" choose the option "Power Point Presentation *.pps).
- " Click on "Ok".
- " In the same folder that you were working in there will now be the icon of a power point presentation with an arrow on it. This is the version of the training course that the learners will follow.
- " Please check very carefully that all the links work properly.
How to create the multiple choice questions for the Unit Practice Exercises
- Download the "Hot potatoes" programme from the following site :
http://web.uvic.ca/hrd/halfbaked/#downloads
Make sure you download the version 5.5.0. Follow the instructions for the download and the installation.- Once you have downloaded the "Hot potatoes" programme you can start creating the test.
- On the Menu page choose the potato "JBC".
- Insert the title of the module where it says "Title"
- In the box below type the question.
- Fill in the possible answers in boxes A, B. C.
- Tick the box which contains the right answer (e.g. A)
- Choose "Manage questions" from the tool bar and click on "Auto Response".
- Fill in the boxes according to what will appear once the learner has answered. E.g "Correct!" for a correct answer and "Sorry! Try again for an incorrect answer.
- Once you have inserted all the questions and answers click on the icon in the tool bar which has the number 6 on it (the icon to the left of the red arrow).
- Save the test as a HTML page - remember you must save it in the some folder as the power point presentation for the links to function properly.
How to create the link from Practice exercise
to the multiple choice practice questions you have prepared
- Select the text "End of Unit 1 - Practice Exercise" and click with the right button of the mouse.
- Click on "hypertext link" (it should be the last choice in the menu list).
- Click on "Existing file or web page" (on the left).
- Click on file (on the right beneath find) and find and click on the HTML file where you want to create the link to, i.e the file containing the questions for that didactical unit. The name of the file will be inserted in the box.
In the example attached, there is just one set of questions for the Practice tests but there should be a separate set of questions for each of the 10 didactical units, i.e 10 HTML pages of questions.
Entrance Test and Final Test
The same test will be used for both the Entrance Test and Final Test. These tests will not be self-assessed but will be sent to the course tutor who will mark the test.
Final stage
Once the Power point document is complete with all the module content, links, attachments, further information, exercises, tests etc. you must save it as Power Point presentation (*.pps) (see C. Annex 2.pps) This is the version the user will see. Please check carefully that all links function correctly.
Pour visualiser le fichier PowerPoint, cliquez sur "document PPT" avec le bouton gauche de la souris.
Pour encoder les contenus de formation, cliquez sur "document PPT" avec le bouton droit de la souris et choisissez "Enregistrer la cible sous". Vous téléchargez alors le document PowerPoint sur votre poste de travail.