Cours pilotes - Firefly
Procedure:
Once the chosen theme (hunting of energy wastings in a school) and the style of game (Thursday Adventures point and click) decided, the first thing to do was the scenario development. It was made in dialogue during the workshops.
In the same time, the 3D scenery were created.
(++)
To integrate in Adventure Maker, the first decision was the size of the image to export. We chose 1024 px width by 768 px height.
In summary, the used software are :
- 3D Studio Max for the scene
- Photoshop for retouching images
- Première for video
- Flash for the interactive handbook
- IcoFX for icons
- and in the end Adventure maker for integration.
Integration into Adventure Maker:
The Adventure Maker's principle is simply to import the pictures representing parts of the game, and add hotspots, clickable points to get from one picture to another! These hotspots also can be pictures of objects that can be taken and included in the inventory, to be used later.
TO CREATE THE projet
- Open Adventure Maker, and choose "new project"
- Enter a name and a destination, and the platform destination. Here : windows.
- Click on "continue", your new project is created now.
We chose to work in 1024 px width by 768 px height. We must to enter these information in the program by clicking on "project properties" in the "project menu" window.

now YOU have to import your frames.
To do this, click on "Create new frame by importing pictures" at the top of the frame management, and select your first picture. When this picture is imported , in the software, you must to write that the game will start with this picture.
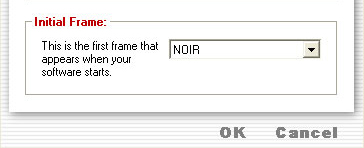
So, go back to "project properties", in the general tumbnail and choose the name of your initial picture.
A piece of advice : the images 'name must be very clear, it will help you when they are imported. The smalls icons view style is clearer.
But sometimes we have to import several times the same frame, depending on the actions. So the name is very important.
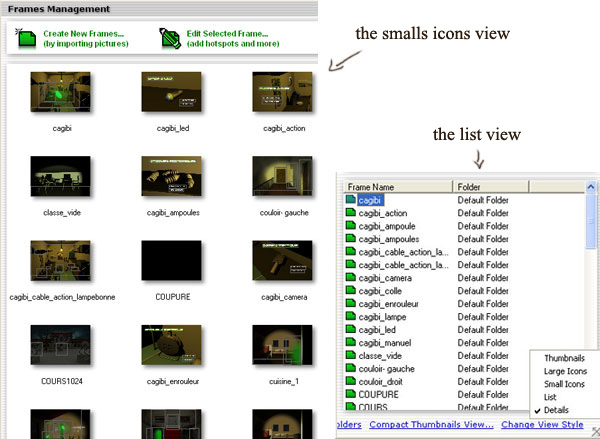
You have to publish your imported pictures : to make the link one to another or to active the clickable points, etc...
Edit frames : to go from a picture to another one :
- Double-click on a picture to edit it
- Draw a rectangle with the mouse to delimit the hotspot (this area can be sized after).
- The hotspot properties window opens, in which you will enter all your parameters.
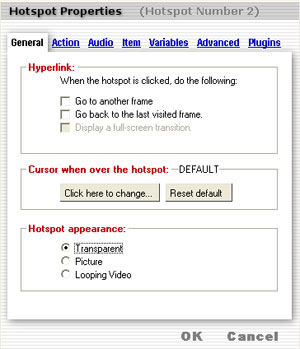
- In the general tumbnail, check Go to another frame, and choose the frame.
The user has to know he can click there, so we must change the shape of the cursor.
- Also in the same place, in the part Cursor over when the hotspot : click Click here to change ... and choose a suitable icon. For example, the directional arrow when there is movement in the same room, or a door to indicate we leave the room, etc..
You can also create yourself new icons. To do this, you need a software to create icons, for example IcoFX. The suitable size for the cursors is 32x32 True color, with the . Ico extension.
You can import your created icon by clicking on Import File... at the top in the window in which you choose your cursor.

- If it's a simply area invisible to click, you select Transparent in Hotspot appearance.
- A message can appear when the user enters into a room: go to Action of the window Hotspot properties, check Display a text message and enter your text.
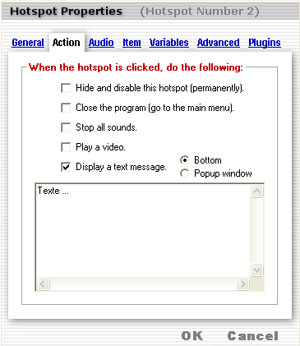
- Click on OK, and you can test your frame.

- Do not forget to edit the destination frame in the same way, so the user can return to the previous frame and he's not stuck in a picture ...
To put objects INTO action : add an object to the inventory.
As you move from a picture to another one, you edit a frame and add hotspost.
- Create a selection where you want to enclose an object. The size of the selection doesn't matter.
The "Hotspot Properties" window should appear. - Here I want to stay in the same room, so that I don't select anything in the Hyperlink menu.
- To give the wanted appearance to the selection, (here, I choose a lamp), select the "Picture" option in "Hotspot appearance".
- Click the button "Click here to select a file...". The Resources Management window will pop up.
- Click "Import File...". The file selection window will pop up.
- Double-click on your lamp's picture (either a lamp on the same background of your picture, or just a lamp with a transparent background).
- Select the appearence of the mouse pointor just like before by clicking Click here to change... under the label when the cursor crosses over the hotspot.
- When you pick the object up, to make it appear in the player's inventory , go to "Item", and then select When the hotspot is clicked, add an item to the inventory.
Click New item...and select your file. The file you must choose is not the same as before, but it's an icon of your object.
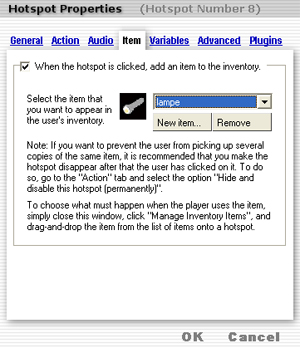
- If you want the hotspot disappears from the screen when the player has picked it up, go to the Action tab, and then select the option Hide and disable this hotspot (permanently).
- Now click on OK to close the Hotspot Properties window. Now, you must put the new hotspot (that has the appearance of the lamp) exactly on the small shelf that supports it. To move it, simply drag-and-drop it with your mouse.

- Test the frame: you'll see that when you roll over the lamp, your cursor will become a hand, and when you click on, the lamp disappears and appears in the inventory, on the top left of the screen.
As you've seen in the Firefly game, the object is not directly taken by clicking on it: there is an intermediate frame where the player can have an instruction, and have the choice to bring it or not.
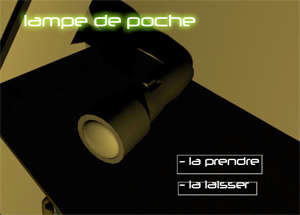
The principle is really simple, and the same as before :
- by clicking on the lamp in the caretakers'room, you'll go to another frame
- in this another frame, if you choose not to take the lamp, you simply go back to the last visited frame
- if you choose to take the lamp, the object is added to your inventory, and you go back to the last frame.
But it's not so simple... because if you test the game, you'll see the lamp will always appear in the room, even if you 've taken it!! To find a solution for it, you have to use Variables.
Use of variables:
The principle will be :
- there is a variable: lampe
- lampe=0 if the lamp object has not been taken
- lampe=1 if it has been taken
- the picture of the lamp in the caretakers'room will be displayed (and clickable) only if lampe=0 (if it has not been taken)
- Go to the caretaker room frame, and double-click on the lamp, to make appear the Hotspot Properties.

- Under the Variables tab, select The hotspot (picture) must be enabled (or visible) only if...
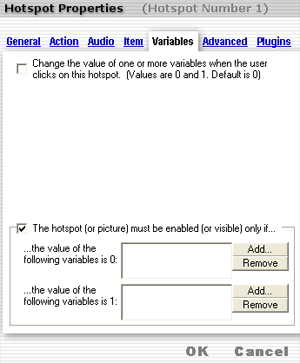
- You must create the variable 'lampe' and add it in the case ...the value of the following variables is 0.
- Click on Add... The Global Variables board appears. Click on New Integer Variable... and enter the name of the variable, click on OK.

- You see, now, the new variable appears in the variable list. Choose it in the list (double-click, or simple-click on OK). You see, it has been add.
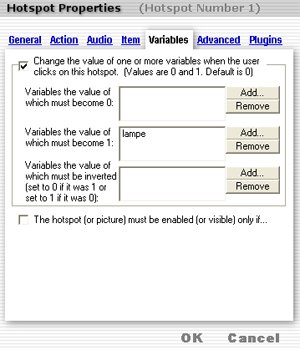
- Click on OK and close this frame.
- Go to the frame where the player can choose to take the lamp or not, and select the hotspot where he must click to take the lamp.
- Go to the Hotspot Properties of your first hotspot and change the first option - under the Variables tab, the variable becomes 1 when the hotspot is clicked.
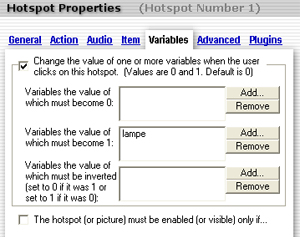
- Click on OK and test it...
USe an objeCt from the inventory:
In our game, to go out of the caretaker's room, the user needs to use the lamp of the inventory :
- Go to the frame where you have to use the object (here, the caretaker's room) and create a hotspot where to click to go out.
- Change your cursor like before, but don't put any destination frame !
- Click on Ok and then click on Manage Inventory Items... from the menu on the left.

- Select the 'lampe' on the Inventory Item List and drag-and-drop it on the hotspot you've just created (press the left mouse button on the item until you are on the hotspot and release it).
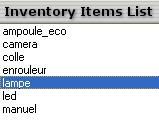
- A special Hotspot Properties window will automatically pop up.
- Under the General tab , select Go to another frame, and choose the frame destination. Then click on OK.
- Test the frame.
In our game, in this case, when we use an object from the inventory, some other actions happen: sometimes a sound plays, sometimes a video or an animation appears.
To make something happen (using an object from the inventory):
- Go back in the rigth frame, and click on Manage Inventory Items... from the menu on the left
- Drag and drop the item 'lampe' on the hotspot (just like before)
- Go to the Action tab of the Hotspot properties, and choose what you want to do...
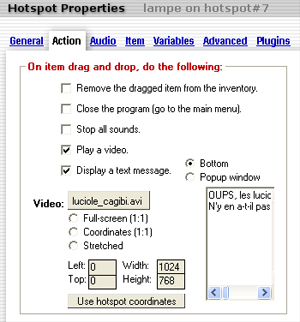
- If you want to add audio, go to the Audio tab.
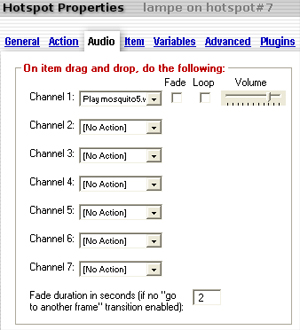
You can choose your file, adjust the volume, choose if it will loop or not,...
(Notice : those options are nearly the same as when you just click on a hotspot)
Add Flash
You can also play Flash movies in the Adventure Maker games.
First create your Flash movie: for Firefly we created an interactive manuel: this is a free flash book. You can have more information or download it here: http://www.pageflip.hu/
- In Adventure Maker, you have to check the Flash Plugin. Go to the Project Properties window and check the checkbox Flash Plugin under the Plugins tab.
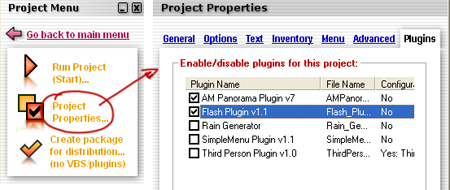
- Open the Hotspot Properties playing a Flash movie when it is clicked (or, as in Firefly, when an object of the inventory is used on an Hotspot).
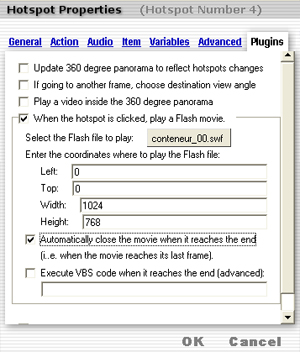
- Go to the Plugins tab and check the option When the hotspot is clicked, play a Flash movie.
- Select the Flash file to play. You can also select Automatically close the movie when it reaches the end, so the player automatically goes back to the game.
