Tutoriaux - Adobe Audition
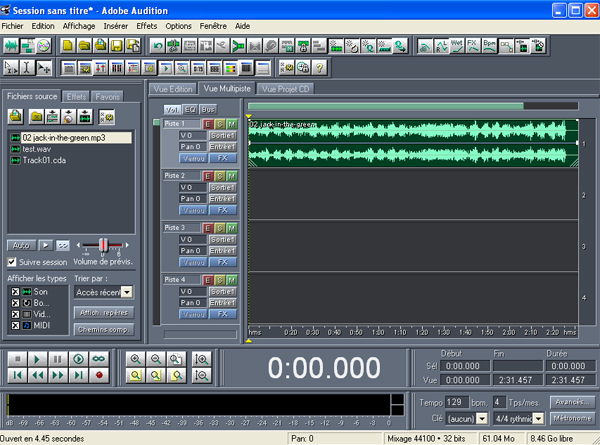
The Multitrack View work area :
In Multitrack View, you can mix together multiple audio files to create layered soundtracks and elaborate musical compositions.
Mixing occurs in real time and is nondestructive. You can change mix settings during playback and immediately hear the results. Because mixing is nondestructive, mixing adjustments don't permanently change original source files.

You can record and mix up to 128 tracks in Adobe Audition, and each track can contain as many clips as you need.
The track controls appear to the left of the track display. It lets you adjust track-specific settings, such as volume and pan. On the right, the track display lets you edit the clips in each track.

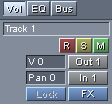
The track controls:
You can adjust several settings for the selected track: (Notice that those settings apply to every clip in the tracks.)

Title: Specifies the track name, which corresponds to the name of the track tab.
Volume (V) : Adjusts the track's volume, measured in decibels. Click and drag up to increase the track's volume; move down to reduce the volume.
Panning (Pan) : Adjusts the track's pan, measured in percentage. Drag to the left or to the right to adjust the volume of the left and right channels
To change these settings with a slider, right-click the Volume or Pan text box.
![]()
Arms the track for recording. Click the Record button in the transport controls to start recording.
![]()
Solos the track so that only it will be heard on playback. All other tracks are muted.
![]()
Mutes the output of the track. More than one track in a session can be muted at one time.
In and Out buttons: you can specify input and output devices for each track. The text on these buttons changes to reflect the device you specify.
Lock: Locks and unlocks the track if it has one or more real-time effects applied to it.
FX: Displays the Effects Rack for the track.
Bus: Displays the wet and dry percentages for a track that's been added to a bus.
EQ: Displays the low, middle, and high equalization values of the track. Drag across these text boxes to adjust the EQ levels. For more equalization control, choose Window > Track EQ.

