
Tutoriaux - Adobe Premiere
Adding effects:
Underneath the Project window is the Effects tab, displaying the available effects and transitions, audio and video.
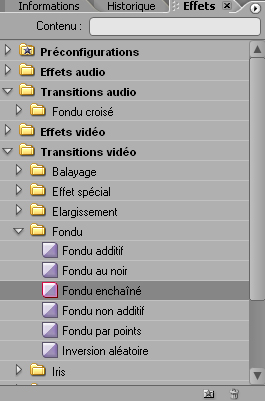
The principle is very simple: just drag one effect to the timeline, and drop it on the clip you want the effect to be. Then you can edit the effect by double-clicking on it on the timeline.
Creating Transitions
A transition is a change from one scene to the next, or from one clip to another.
Transition Effects are used to seamlessly link clips together. They are one of the key components of professional video editing. The simplest transition is the cut, where the last frame of one clip leads directly into the first frame of the next. But you can use transitions to create artistic effects such as dissolves, wipes and zooms; or a fade in/fade out to signify the passage of time... Adobe Premiere Pro comes with 73 different transitions...
To insert a transition:
- Find the two clips in the Timeline where you would like a transition. Adjust the slider-bar to to expand the track.
- To create your transition, you need to overlap the two clips in the Video 1 and Video 2 tracks. The overlapping portions of the clips are used in the transition.

- Select a transition in the Effects palette and drag it to the timeline where the second clip begins (or to the juncture if both clips are on the same track). It appears in mauve in the clip.

- Double-click on the effect in the clip to edit the transition. onglet A new You can edit the transition, changing the length... : double-click on the effect in the clip, and a new panel will appear in the Monitor Window > Effect Controls:
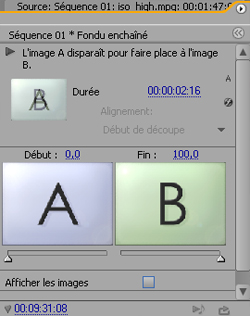
Depending of the effect, you can change the lenght and other options. The letters A and B represent the 2 clips. But instead you can display images of the clips.
Adding Special Effects
Adobe Premiere Pro includes a variety of audio and video effects that you can apply to clips.
An effect can add a special visual or audio characteristic or provide an unusual feature attribute. For example, an effect can alter the exposure or color of footage, manipulate sound, distort images, or add artistic effects. You can also use effects to rotate and animate a clip or adjust its size and position within the frame...
To add video effects:
- Drag-and-drop the effect to a clip, or select the clip and drag the effect to the Effect Control panel.
- The effects you've used are listed in the Effect Controls from the monitor view.
- The intensity of an effect is determined by values that you control. The controls for all effects can also be animated using keyframes in the Effect Controls panel or Timeline panel.
- You can combine as many effects as you like on a single clip, which can produce surprising results... Just test them.
Changing a clip's opacity :
If a clip is on Video 2 track or higher, you can make it partially transparent by changing its opacity. The opacity option lets you superimpose one or more clips on top of others, so that two or more clips are visible at the same time.
To change the opacity of a clip:
- Select the clip you wish to alter in the timeline. The horizontal bar in the clip is the opacity bar.
- Move the pointer onto the opacity bar and click within your clip to set a handle . The handle divides your clip into sections that you can adjust by dragging.
- Click and hold the handle and drag it downward. You see the percentage opacity as you drag.
If you reduce the opacity of a clip on Video 1, it will appear darker, because the transparency is replaced by black. But if you reduce the opacity of a clip on Video 2, the clip in video 1 will appears by transparency. This process is called superimpose.
Transparency key
To specify that certain areas of a clip become transparent and other areas remain opaque, you need to use a transparency key.
A transparency key (often referred to as a key) makes designated colours (or range of colours) in a clip transparent or partially transparent. A blue screen key (or a green screen key), for example, makes a shade of blue (or green) transparent. In this way, an actor can be filmed against a blue screen, and then superimposed on an outdoor action scene.
Creating transparency with a particular colour is called keying out that colour.
- Place the clip you want to be transparent in the Video2 track.
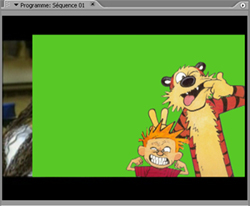
Here, the green zone has to be removed. - Add a keying effect from the Effects tab:
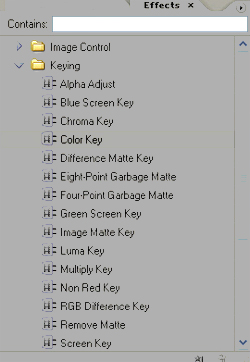
- The background is green, so you could apply the Green Screen Key filter. But sometime you'd worth choose another filter, because iit won't be able to get the various shades of the green background...
- You may use Color Key filter. Drag the effect to the clip and adjust the parameters:
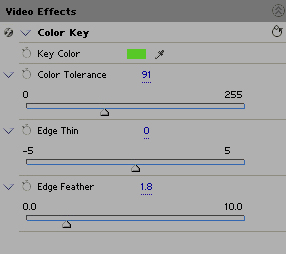
- Key Color: You can choose which color to remove
- Color Tolerance: Determines how wide a range of the selected color to remove.
- Edge Thin: Expands or contracts the mask.
- Edge Feather: Adds a small amount of feathering to the edges of the mask to smooth things out.
- See the preview:
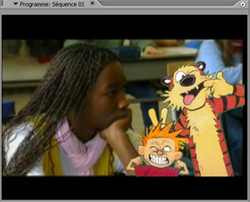
Titles
You can create very sophisticated titles, including rolling or scrolling horizontally or vertically:
- Choose File > New > Title
- Input a name
- The title dialog box appears, with a previeuw of your video.
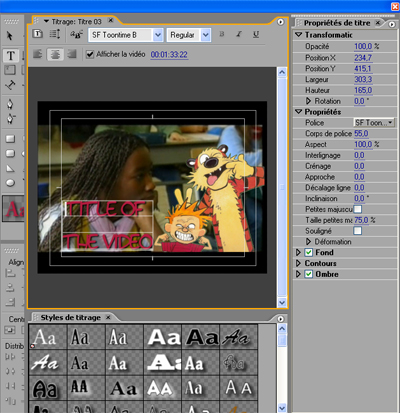
- Write your title, in the preview square. Choose the parameters...
- To make a scrolling title clic on the scrolling icon
 and choose the parameters.
 - When you're finish, close the window, the title is now in the bin.
- Drag it to the video 2 track on the timeline.

